How To Turn On Autosave For A Office Mac
Office 2011 for Mac is full of useful features, including the autorecovery tool in Excel. Although crashes in Excel for Mac 2011 are extremely rare, it doesn’t hurt to make sure Excel 2011 is backing up your changes as you work. The following sections show you what to do to ensure Excel is making backups and how to retrieve the backup if you need to.
Oct 31, 2018 To enable AutoRecover for documents that you store locally on your computer, do the following: Open Start.; Search for Word (or any Office app). The easy way is to turn the AutoSave switch off before you make your changes. If the changes are meant to be temporary and not saved, close the file. Then click No when you are asked to save. If you decide you do want to save the changes, just turn AutoSave back on. Lf h50x drivers for mac.
Setting up AutoRecover in Excel for Mac 2011
Take a moment to make sure your preferences automatically save an emergency backup file of your work. Before you do that, remember that AutoRecover is not a substitute for saving your files often! To set up AutoRecover, follow these steps:
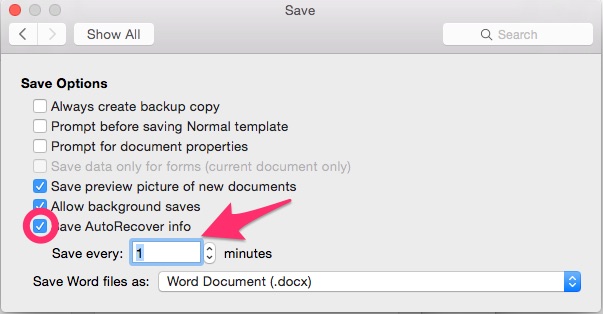
Choose Excel→Preferences from the menu bar.
In the Sharing and Privacy section, select Save.
Select the Save AutoRecover Information After This Number of Minutes check box.
Enter the number of minutes that you want between AutoRecover file saves, or use the increase/decrease control.
Click OK.
After you turn on AutoRecover, Excel saves your work at the specified interval so that you can recover in the event that the system or Excel crashes.
Retrieving an AutoRecover file in Excel for Mac 2011
If your computer or Excel crashes, you can recover your work up to the most recent AutoRecover save, but only if you turned on AutoRecover saves. Take these steps to restore any workbooks that were open at the time of the crash:

Click the Excel Dock icon.
Excel presents any documents that you’re working on that have been saved at least once. Recovered documents have (Recovered) in the title bar.
To keep the recovered version, choose File→Save As.
The Save As dialog appears. Take one of the following actions:
How to Download and Install SuperNDS (NDS Emulator) for PC or MAC:. Emulator ds download for mac. Open the emulator software from the start menu or desktop shortcut in your PC. For example, BlueStacks requires OS: Windows 10, Windows 8.1, Windows 8, Windows 7, Windows Vista SP2, Windows XP SP3 (32-bit only), Mac OS Sierra(10.12), High Sierra (10.13) and Mojave(10.14), 2-4GB of RAM, 4GB of disk space for storing Android apps/games, updated graphics drivers.Finally, download and install the emulator which will work well with your PC's hardware/software.
To replace the existing file with the recovered version:Navigate to the file or use Spotlight to locate the existing file. Then, click the filename to change the recovered file’s name to the existing filename. Click Save to overwrite the existing file.
To save the recovered file without overwriting the original: Select a location to save the recovered file and enter a name for the file in the text box. Then click Save.
To discard a recovered workbook, click the red Close button to close the workbook. When prompted, don’t save changes.
To permanently remove AutoRecover files from your computer, follow these steps:
Quit all open Office applications.
In Finder, press Command-F.
Enter AutoRecover in the text box.
Select all AutoRecover files.
Drag the files to the Trash.
Empty the Trash.